Without any doubt, fonts are one of those elements which can create a spectacular impact on the reader. So, in order to make your document super impactful, you would like to use good fonts in a document.
But how can you set your favorite font as the default one in Microsoft Word? If you are going through this query then this article has all the answers.
So, in this article, we will tell you How to set the default font in Word? After going through this article you will be capable of changing the default font in Microsoft Word. So, let’s get started:
How to Set the Default Font in Word?
Step #1: In this very first step of this method, you are first required to open Word application on your system. For that, you can consider going this way. First, go to the start section and type “Word.” After getting the relevant result, click on that and this will open the Word application for you.
Now, after this, you are required to open any word document which has some content in it. Alternatively, you can open a blank document and enter some random text on it. Go for whatever suits you best.
Once you have done this then, you are required to look out for our next steps.
Step #2: In this step, you will have to select some part of the text so that we can select the font and then set it as the default one. So, for this, you can place the cursor and drag it till the point you want to select the text.

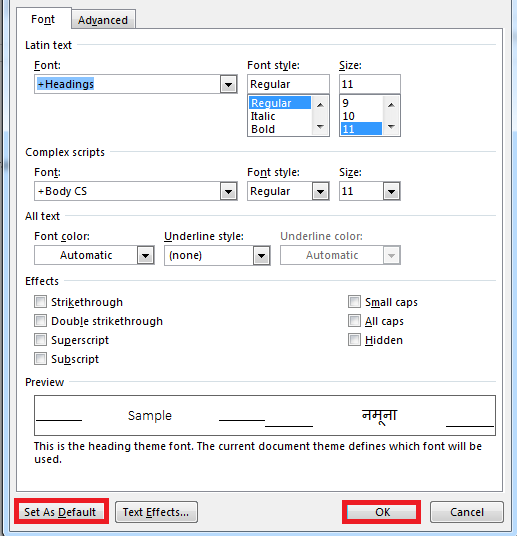
Step #3: After you have selected the text then now you are required to make a click on the “font” icon at the home tab. It looks very similar to a diagonal arrow placed in an inset.
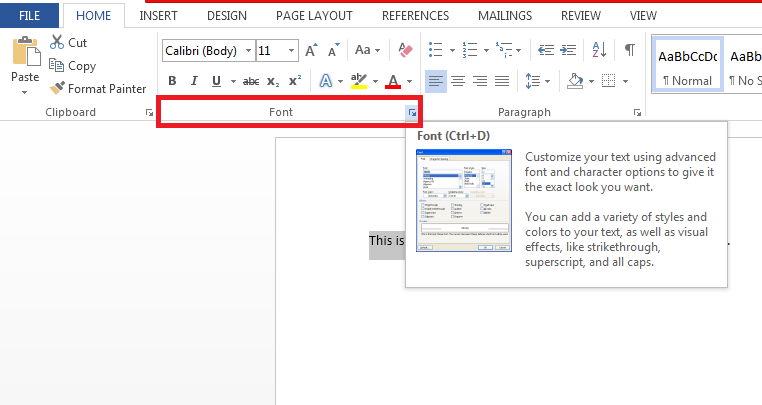
Clicking on it will open a dialog box as shown below.
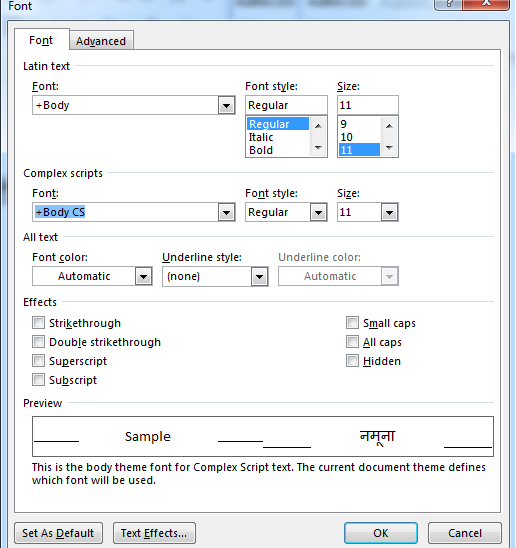
Step #4: Now, click on the down arrow button at the font field. This will open a list of the available fonts. Now, you need to select the appropriate font which you want to set as default. You can also see the preview of the font in the font section.
Once you have selected the font and other fields according to your needs, then you are now required to move on to the final step.
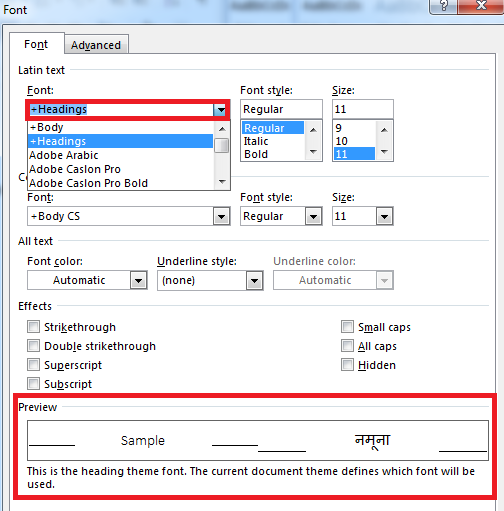
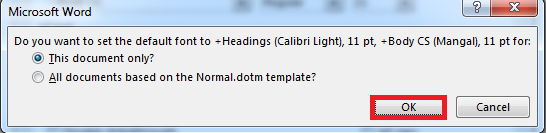
Step #5: Now, in this final step all you need to do is to click on “Set as default.” This will open a dialog box that will ask you whether you want to set the default font for the current document only or all other documents as well.
Since you require setting the selected font as the default one so, you need to choose the checkbox next to which “All documents bases on Normal.dotm template” is written.
Just confirm your action and click on OK.
This will set the default font in Word. See, how easy it is.
[Additional Information]: How to add fonts in Microsoft Word?
Many times, you would find the pre available fonts in Microsoft word not appropriate for your needs. So, in that case, you would like to install other fonts. If you want to know how you can do that, then you are certainly in the right place.
In this additional section, we will walk you through all the steps that are required to add a font in Microsoft Word.
So, let’s get started with the same.
Step #1: First of all, you are required to download the desired font. For this you can make a search on your favorite search engine or visit some good free fonts sites like “dafont.com” or “1001fonts.com”.
You can visit any of those and download the fonts which suit your requirements. Once you have downloaded the font, then you can indeed proceed with the next steps to look into the proceedings.
Step #2: In the most general cases, the font will be downloaded in zipping or RAR format. So, after downloading the font in step #1, you now need to extract that font.
For this, you should have any good zip or RAR file extractor. WinRAR is one such good software to do the needful. However, if the font comes as a sole otf or ttf file then you can skip this step.
In order to extract the font, all that you need to do is to make a right-click on the downloaded folder and then select “Extract here” or “Extract files”.
The latter one will open a window to which you have to specify the path of where you want to extract the font while the former one will extract the font to the current folder.
We recommend you to extract the font at the current folder and then copy it to the desired folder of which we will be telling you in the next step.
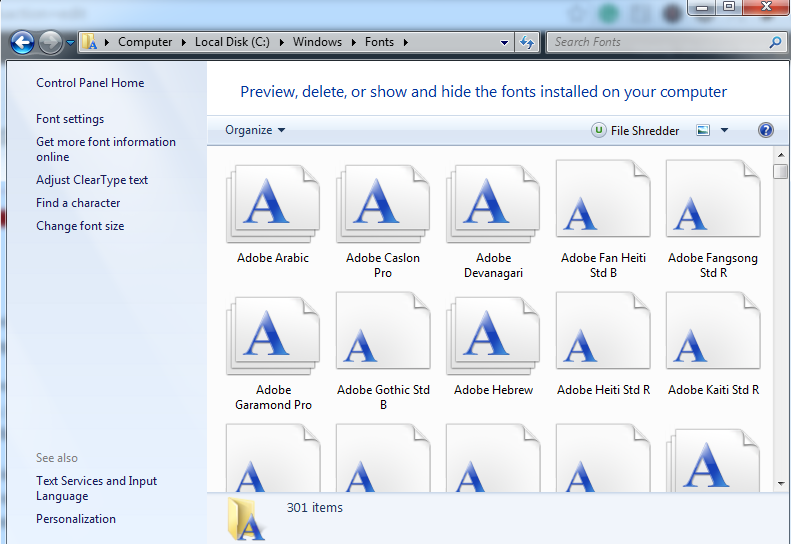
Step #3: After you have extracted the font from its folder then you are now required to copy the font to the following location “C:\Windows\Fonts“. Now, you will have to navigate to this folder and look out for your desired font.
Been there, you now need to double click on that font in order to install it. The font will now be installed once you click on the install button.
Step #4: Now, you will be able to see the font on your Word application. You can now set it as the default font in Word by using the method provided above (if only you wish).
Wrapping Up.
So, this wrapping up section brings us to the end of this article on “How to Set the Default Font in Word“. We hope that after going through this article, you will be able to know ” How to set and keep your preferred default font in MSC Word“.
If this article has helped you in any manner, then do not forget to share it with your peers. Additionally, if you have any other method, suggestion or query regarding this topic then do let us know through the comments section below. We would love to hear from you.
Thank you for passing by and giving it a read.
Stay tuned and keep visiting.