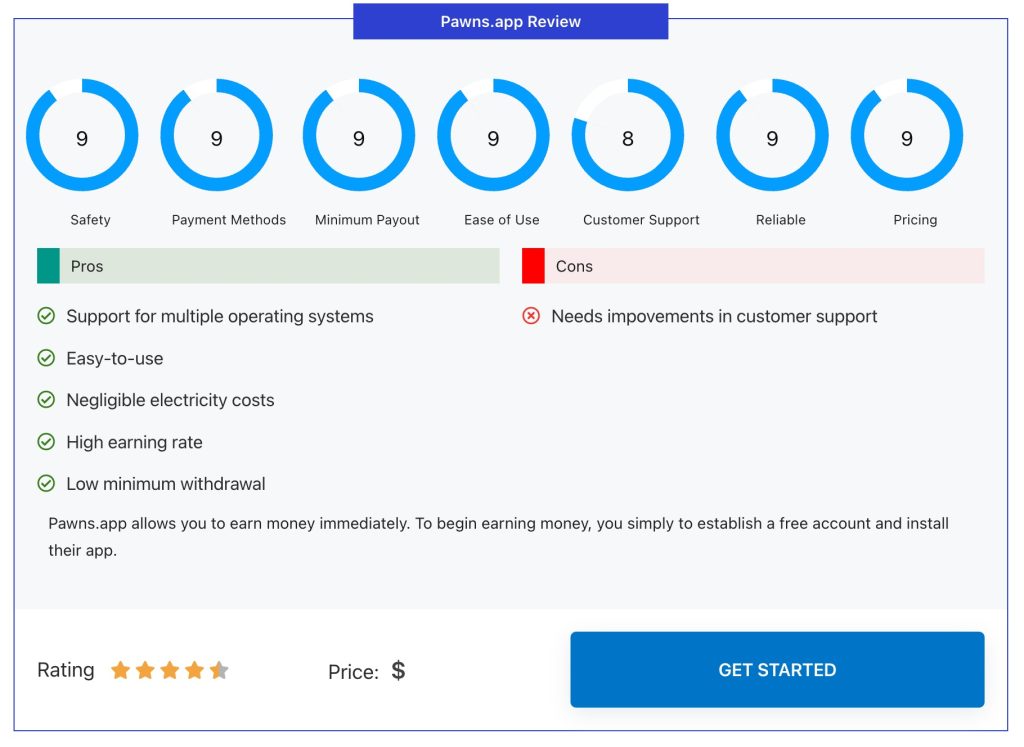
Schemaninja logo

How To Start A Podcast On Youtube In 2023?

Affiliate disclosure: In full transparency – some of the links on our website are affiliate links, if you use them to make a purchase we will earn a commission at no additional cost for you (none whatsoever!).

Podcasting is a great way for businesses and individuals to generate brand awareness and deliver content to an audience.

You should consider YouTube as one of the biggest platforms for audio content on the web. What are the steps to start a podcast on YouTube?

Thank you so much for asking. This post explains how to create a podcast from the ground up with YouTube as one of the end goals:

  1. What equipment do you need for podcasting?
  2. Create a podcast
  3. Get your podcast ready by editing and preparing
  4. You need to set up your podcast feed and media hosting
  5. Select a video format
  6. Creating a YouTube channel for podcasts

The following six steps should make it easy for you to understand the process and start your own YouTube podcast!

An Important Caveat

Having a podcast on YouTube isn’t for everyone, so let’s explain exactly what that means. Youtube is not a podcast hosting service, but a search engine.

Your podcast would cease to be a podcast if you uploaded it only to YouTube; it would simply become a YouTube channel.

What does that mean? That depends on what you want to achieve.

Create your own YouTube channel if you’d like to build your brand. Nonetheless, if you want to get your episodes on all major podcast platforms (like Spotify, Apple Podcasts, and Google Podcasts) you must produce a podcast and then upload the episodes to YouTube to build an audience.
With that out of the way, let’s move on to how you can start a podcast.

1. Select the right recording equipment and software

how to start a podcast on youtube

Start by deciding what kind of equipment and software you will use for your podcast.

Podcasting Microphones of Choice

Choose the right microphone for your needs based on whether you’ll need a USB connection or an XLR connection with a mixer.

Consider your recording environment as well; if you’re recording in a controlled environment, a condenser microphone will be your best option (which enhances vocal richness but is sensitive to background noise). A dynamic microphone is a good choice if you have to record outdoors or in unpredictable environments.

On the market today, you can choose from these popular podcasting microphones:

  • Blue Microphones Yeti
  • Rode NT-USB
  • Rode Procaster
  • Rode PodMic
  • Audio-Technica ATR2100-USB

Podcast video cameras most popular

You will want to have a quality camera ready for your recording session, especially if you’re planning on uploading your podcast to YouTube.

Many podcasters choose external webcams over their computers’ built-in webcams because they’re easier to use and provide crisper, clearer images.

You can find some of the most popular brands below if you’re shopping for a webcam:

  • Logitech HD Pro Webcam C920
  • Logitech C922

An alternative would be to use a handheld camera. It’s likely that you’ll be setting the camera on a tripod while recording unless someone is holding it for you. Due to this, most long-form podcasters avoid using DSLRs or mirrorless cameras (since these devices auto-off after 30 minutes).

Below are the best podcasting video camcorders:

  • Sony HDR-CX405/B
  • Canon VIXIA HF R800
  • Panasonic HC-V770K Full HD Camcorder
  • Nikon COOLPIX B500
  • Sony Alpha a6000

‍Recording software.

The final step is to choose the podcasting software you will use. For those who are new to podcasting, GarageBand (if they are Mac users) or Audacity are the most popular options.

We are biased toward River.FM’s features for recording remote interviews with a high level of quality and a low barrier to entry.

It is important to invest in quality software that will get you professional-level results if you are serious about podcasting and conducting a lot of video calls online.

Make sure to choose recording software that is simple and reliable. Also, take into account what format you’re creating; if it’s an interview podcast, you need to record conference calls in high quality (ideally with separate audio/video tracks for each guest), then edit in post-production with another software if necessary.

You can probably record and edit the podcast in one program if it’s a solo podcast.

2. Record Your Podcast

Record Your Podcast

As a next step, you’ll need to decide how you’re going to record the audio, both for output on your media hosting platform as well as for uploading to YouTube.

You need to think about how you will present your podcast on YouTube since it has a visual component.
Lastly, it’s important to note that a “video podcast” differs technically from a static image with sound layered over it.

A true video podcast is more than a simple audio podcast with an accompanying picture, but most podcasters just upload their audio recordings with accompanying images. The following section describes how to record a podcast for YouTube.

Record Audio-Only

As a podcaster, you’re probably drawn to audio media. If you plan to upload your recording to YouTube, it’s simplest to record audio-only and then add images as background images.

Using graphic design software like Canva or Inkscape, you can create a simple background by converting audio files into .mp4s (since YouTube doesn’t accept .mp3 files).

You don’t need to get fancy when creating your background images. For example:

  • What is the name of your podcast?
  • The URL of your website
  • Logo for the podcast
  • This episode’s host and guest are listed below.

YouTube images are recommended to have a dimension of 2560×1440 pixels, or a 16:9 aspect ratio.

The thing to keep in mind is that YouTube podcasts without video are less engaging than those with video. Choosing one of the methods below is the best way to upgrade your video game if you plan on using YouTube podcasting as the main part of your audience-building campaign.

Using the webcam on your computer, you can record a video podcast

You can also record your podcast using just your computer’s webcam and either a built-in microphone or an external microphone. You may benefit from this low-cost setup if you run an interview podcast.
You should invest in quality recording software if you choose to record remote interviews.

Riverside.fm records up to eight participants locally on their own devices, eliminating concerns over slow connection speeds, which are problematic in many video conferencing programs.

To enable this feature, choose an external camera and click “Record.”

You may also want to consider recording the podcast with one or more external cameras. Many people choose this setup when conducting interviews or conversations in person.

Your iPhone and a tripod are all you need; no expensive equipment is required.

In addition, you should take note of the “set,” since you’ll be recording sections of your room as the background. At a minimum, set up your camera where you’ll be recording and get an idea of what percentage of the room will be in view. Afterward, set the background in the manner you prefer.

3. Prepare your podcast for publication by editing it

Prepare your podcast for publication by editing it

It is now time to post-produce your podcast episode after it has been recorded. Although most YouTube podcasters don’t edit their recorded podcasts, the product must still be prepared for an end product. You’ll want to do the following:

  • Your video should be transcribed
  • Creating engaging graphics or slides for your podcast is a good idea if it’s audio-only
  • Prepare your YouTube videos for publishing by breaking them up into smaller “micro-contents” (more on this in step 5).
  • It is recommended that you edit your podcast recordings using software such as GarageBand,
  • Audacity, Adobe Audition, or Reaper.

4. Set up your podcast feed and media hosting

The chances are that you already have your podcast feed and media hosting set up if you have already launched a podcast. The next step is for you if you haven’t already started a podcast.

You should not use YouTube as your primary hosting provider – since then it would just be a YouTube channel and not a podcast. If you have a YouTube channel, you could promote your podcast to other podcast platforms, but this wouldn’t maximize your podcast’s reach.

So before you start uploading videos to YouTube, it’s crucial to set up your hosting and feed.

Choose a platform for your podcast feed as the basis of your podcast feed. Among the most popular platforms are:

Creating a podcast feed can be done on these websites, which are repositories of your podcast audio files. For starting a podcast, a hosting platform or podcast host is essential, just like with a blog.

Your first few podcast episodes will need to be published on a hosting site so that your RSS feed can be submitted to iTunes, Google Podcasts, Spotify, Stitcher, and any other podcast directories where people find their podcasts.

Your podcast can now be uploaded to YouTube.

5. Select a YouTube video format

Select a YouTube video format

A podcaster can upload content to YouTube in a few different ways. If you choose (or if you choose a combination) it depends on how much time and energy you have to put into editing and organizing – in addition to your marketing goals. Here are three options to consider.

Upload the entire episode

YouTube is the easiest way to upload every episode directly.

Planning and editing aren’t needed with this method. It’s also easy to automate using apps such as Repurpose.io and Podbean.
Unfortunately, there are some downsides as well:

  • You won’t need to be on iTunes or Spotify if your audience can watch your entire episode on YouTube. This can affect your sponsorship numbers because fewer listeners will subscribe to your podcast’s RSS feed.
  • Naming videos is more difficult. Search engine optimization (SEO) is key to appearing in YouTube’s search results because YouTube is a search engine. A title that encompasses the entire contents of a long podcast episode is hard to come up with as a search engine optimization strategy.
  • The video may be too long for some people to watch. Despite the long length of many podcasts, your audience may not watch the whole thing in one sitting. As a result, your SEO will suffer.

You will need to verify your Google account with YouTube if you upload videos longer than 15 minutes. It’s a fairly easy process, however.

Once you’re a verified user, you can upload files that are 128 gigabytes or smaller within 12 hours. Your video file may be too large, so you should try compressing it in a video editor.

Stream Live

You might try streaming some episodes live on YouTube once you become more familiar with podcasting as a process. It allows your audience to engage more actively with the content.

Transform Your Podcast Episodes into Micro-Content

In my opinion, the best course of action is to break up your podcast recordings and use them as micro-content on YouTube. Upload clips of your episodes as easier-to-digest videos with titles that will help with SEO.

It’s much easier to share micro-content on social media, and more videos equal more downloads – which results in more sponsorships. Due to the fact that you are not posting complete episodes to YouTube, your short videos are more likely to drive viewers to your website or RSS feed.
However, this method has a few drawbacks.

To title all your videos correctly, you’ll need to have YouTube SEO knowledge. If you produce micro-content, you’ll need more editing and uploading time.

While uploading your videos as micro-content may seem more complicated at first, it gives you more creative possibilities and greater audience engagement.

Also, read:

6. Create a YouTube Podcast Channel

Create a YouTube Podcast Channel

Let’s end by talking about how to create a YouTube channel for your content.

  • Create an account on YouTube if you don’t already have one. You can use the same username and password if you have a Google account or Gmail.
    Go to the channel creation page (or select “Create a channel” in your account settings). Fill out the requested information (your country, date of birth, gender, and privacy settings) and click the “I’m done!” button.
  • Publish videos on your channel. Click the Upload button on the home page of your channel (“youtube.com/yourchannelname”). A live stream can be started here, or multiple videos can be added at a time.
  • Feedburner can be used to create enhanced feeds. It allows you to track the statistics of your podcast feed, add a summary to episodes, add iTunes podcasting elements, as well as list keywords and categories.
  • Put a subscribe link on your website to the YouTube RSS feed. In addition to adding a YouTube link to your website or blog, it makes sense to direct your website or blog audience to your YouTube channel. A subscribe link should be provided by Feedburner, or you can use YouTube’s standard format.

Separate YouTube channels can be created to keep your content organized. You might upload an entire episode to one channel and highlights or clips to another, or you might divide your content into categories by topic. Your content will be more engaging if visitors are able to navigate it easily.

Diksha

A graduate of the IIMC, Diksha enjoys testing out new tech products and services. Her goal is to help others make more informed purchases of tech products and services. In her spare time, she enjoys traveling, watching movies, and listening to music. An ardent reader loves to be surrounded by technology.

Leave a Comment