When using a newly bought SD card, we often confront the term write protection, isn’t it??
Imagine the scenario when you just bought an SD card for your phone or computer to backup your data and to increase the storage capacity of your phone! You insert it into your computer via the card reader, copied your fav music and images from the computer and tried to paste it into the SD card and heck, what you see is the following error message.
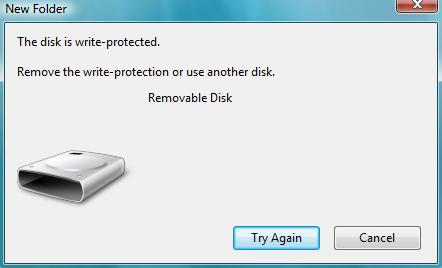
If your SD card is write-protected, you can’t copy your data into it, can’t delete its data and can’t use it the way it is meant to be! If an SD card doesn’t allow you to write your data on it, then what’s the point of buying an SD card??
Well, write protection in SD cards is not permanent and neither it is designed to annoy you! In fact, it is a very useful feature of SD cards and helps us protect our data from being overwritten.
We won’t go in-depth about what this feature is designed for! In fact, we are here to teach you just the opposite of that. The purpose of today’s guide is to teach you How to remove write protection from SD card, and that’s what we will guide you through!
Removing write protection from SD cards is extremely easy, and there are multiple methods to do that. Let’s figure out what are they!
How To Remove Write Protection From SD Card:
There are more than one way to remove write protection on an SD card. Let’s see what are the different methods.
#Removing Write Protection From the card Itself:
Most of the new SD cards now come with a lock on it to remove and apply for write protection. Using this notch to remove the write-protection from an SD card is the easiest way you can do that. Here’s how to do that.
Step 1. Take the SD card in your hand facing the label up and try to find the lock button. It’s a little slider kinda button on the top left of your SD card. You can take the idea of the lock button from the image below.
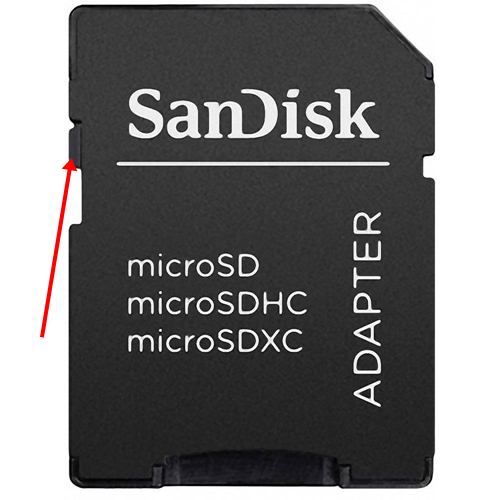
Step 2. When the lock button is located, slide it to the upper direction to unlock your card for lock protection. Simple enough, isn’t it?? Let’s check out the second method for doing the same.
#By Formatting the Card:
If your card doesn’t have a lock button, no worries. You can still unlock your SD card and remove write protection from it by simply formatting it. Wondering How to Format A Write-protected SD Card??? Check out the steps below.
Step 1. The first step is to insert your SD card to your Windows computer. You can do that by inserting the SD card into the card reader or using the card adapter. Or you can also use the USB for the same.
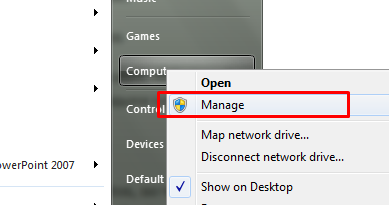
Step 2. When the card is connected to the computer, click on the start menu and move your cursor to my computer. Now right-click on it and select the option Manage. See the below screenshot to locate the option more easily.
Step 3. On clicking the Manage option, a new Computer Management window will pop-up which looks like the below image.
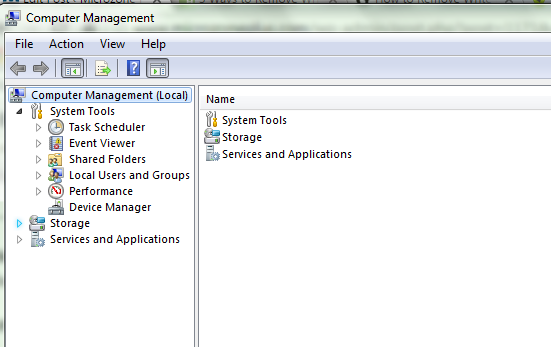
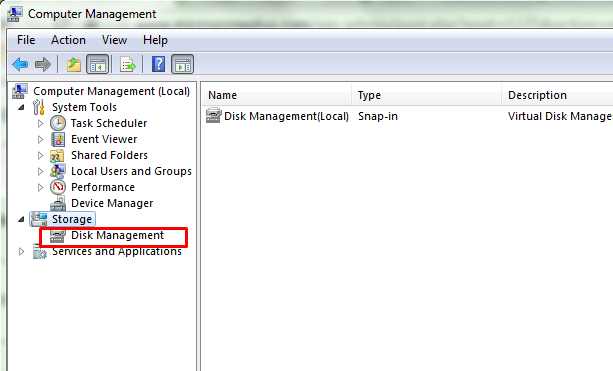
Now you need to double click the options Storage in the left pane and select Disk Management.
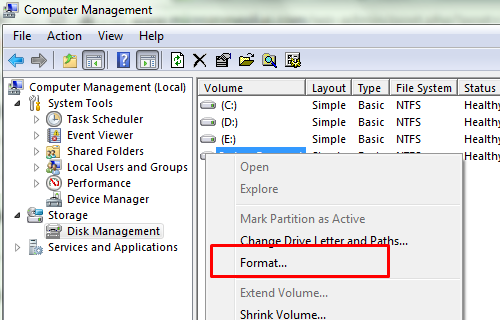
Step 4. As sooner you click on the Disk Management, Windows will load the list of storage devices you are currently using on your computer. One of these options will be the SD card connected to your computer.
Right-click on it and select Format.
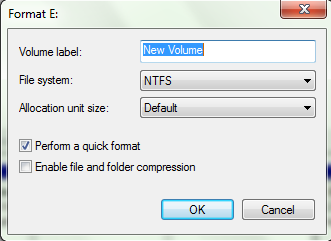
Step 5. Once you click Format, a new format window will pop-up. You don’t need to do anything here, just click Ok and your SD card would be formatted. Have a look at the screenshot below to see how the format window looks like.
And needless to say, when the format is complete, your SD card would be free from write-protection.
#From the Diskpart Utility:
The next method in the list is using the Diskpart utility of windows. Try this method when the above method doesn’t work. To make your windows free from write-protection using this method, follow the steps below.
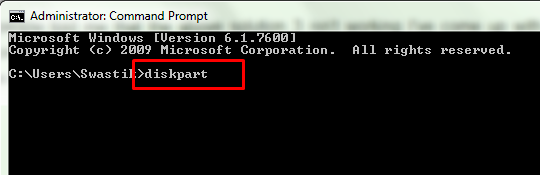
Step 1. Click on the start menu, type in CMD in the search bar and type in CMD there. Right-click on the first search result and select Run as Administrator.

Step 2. When the command prompt is open, you need to run the following commands one by one. First, start with Diskpart. Write Dispart in the command prompt and press enter.
Step 3. When done, type again the command list disk and press enter. When done, move ahead to the next step.
Step 4. Now type in Select disk x, this is the SD card which is supposed to be free from write-protection. When done, press enter.
Step 5. After the above command, you need to run the attributes disk clear read-only. This is the last command we need to run. When you are done doing that, type exit and press enter and come out of the command prompt.
Now check your SD card to see if it has become write-protection free.
#From the System Registry:
The fourth method to remove write protection from an SD card is in the system registry. Let’s check out how to erase a write-protected SD card using the system registry. Here’s what to do.
- Open the Run window by pressing the windows+R key.
- Now type in Regedit in the search field and press enter.
- In the Registry Editor, follow the path HKEY_LOCAL_MACHINE/SYSTEM/CurrentConrolSet/Control/StorageDevicePoi. Doing that will lead you to the option write protection in the right pane.
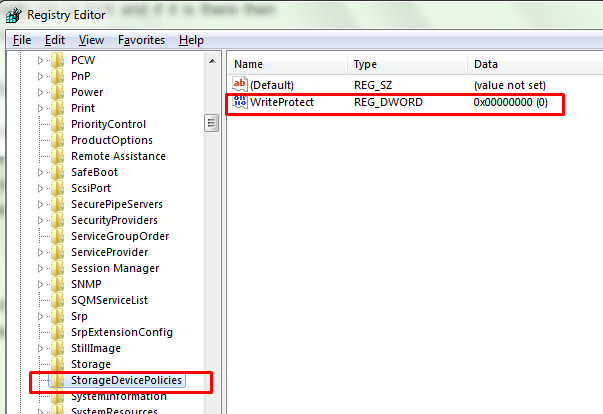
- click write protection and set its value to 0.
And the write protection from your SD card would be removed. Now you can use it normally for storing different photos, videos and whatever you would like to. When the card is full, you can keep it safe by putting the write protection again.
If you have even more queries or doubts on how to remove write protection from the sd card, drop us the comment below.